We decided to build something cool for April Fools’ Day a few days ago. We wanted to make it fun, hilarious, and fully open sourced. Introducing… TechScrunch! 📰
TechScrunch is a tech news website about anything and everything trendy. As it is a project for April Fools’ Day, all news will be generated to be fake, but mention it’s a joke at the end. We added one extra feature compared to TechCrunch, which is the ability for visitors to generate articles based on any title they can think of. This will allow you to prank friends with articles about them 😜
🧮 Aftermath
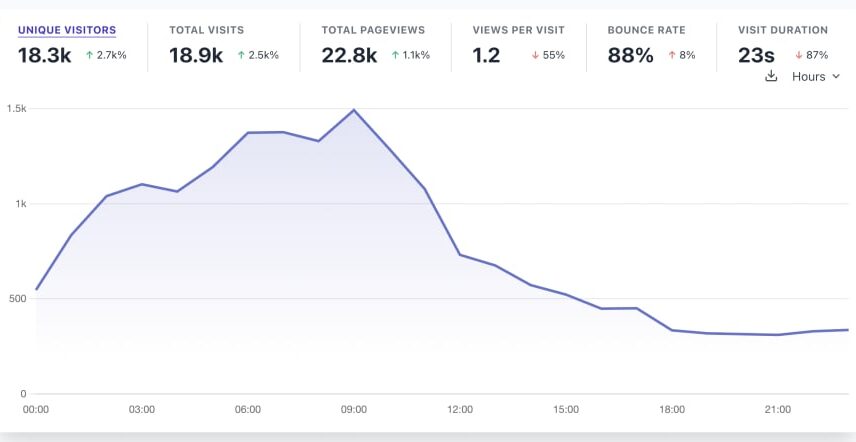
As we launched on ProductHunt, all metrics started to rise. With the addition of tweets and a few posts on subreddits, we were steadily seeing over 150 concurrent visitors within a few hours. By the end of the day, we got almost 20 000 visitors, served over 40GB of data, and served over 1 million requests! 🔥
We also got dozens of visitors to register and generate funny articles on various topics, from Revolutionary App That Helps You Find Your Lost Socks to Top 10 Minecraft servers. With over 100 articles generated, we knew we had succeeded in making April Fools’ Day a little bit more enjoyable for the world 😇
What’s even more impressive, Tim Sneath, a Director of Product at Flutter, noticed one of our articles and made a follow-up. They even made a demo app from our fake idea 😆
We have an early version running. Still experiencing a few glitches on Windows 95, but it’s working really well on Windows NT 4… #Flutter #RunsEverywhere twitter.com/adityaoberai1/…19:51 PM – 01 Apr 2023
Wait, did #Flutter just release support for Windows 95??? 🤯🤯🤯
Get the latest deets on @TechScrunchdev 🔥
https://t.co/JRrD1EYIRb
🧱 Tech Stack
To reduce the time needed to develop TechScrunch, we used Appwrite Cloud to remove all the need to write a custom backend to authorize and store the data.
We strived for simplicity on the frontend side of things too, which led us to use Svelte Kit as our web framework for building the web application. We also used SCSS for styling, which allowed us to replicate the design of TechCrunch quickly.
Overall, the combination of Svelte Kit, Appwrite, and SCSS made this project fun, quick, and enjoyable to develop.
Setting up such a project is really simple. Since SCSS comes pre-installed with Svelte Kit, we got both set up with one command:
npm create svelte@latest techscrunch
You can find the source code in the TechScrunch GitHub repository.
To add Appwrite, we installed its web SDK and prepared an AppwriteService.ts, a file to hold all the Appwrite-related logic.
npm install appwrite
import { Account, Client, Databases, Functions, ID, Storage } from 'appwrite';

const client = new Client()
    .setEndpoint('https://cloud.appwrite.io/v1')
    .setProject('techScrunch');

const databases = new Databases(client);
const storage = new Storage(client);
const account = new Account(client);
const functions = new Functions(client);

export const AppwriteService = {
    register: async (name: string, email: string, password: string) => {
        return await account.create(ID.unique(), email, password, name);
    }
    // More to come
}
Additionally, we created appwrite folder and ran appwrite init project in it. Later, we will run more commands here to store our Appwrite project initial setup.
🗃️ Database Spotlight
Since we are making a clone of an existing website, it’s really easy to prepare a database structure to allow all the functionality we need.
First and foremost, we will need a collection to store articles. Here we will store a few string attributes such as title and content and relationship IDs categoryId authorId, and imageId. We will also need boolean attributes to render articles in different places, such as isPromoted, isPinned, isPlus, and isPublished.
Next, we create collections for all relationships that we defined. We start with categories collection that has string attributes name and description. Then, we create authors collection to hold all info about the author, such as name, bio, email, twitter, and imageId. Notice we don’t need a custom collection for image IDs, as those will point to the Appwrite Storage file.
Finally, we create a tags collection with a single string attribute name to introduce the tags feature. To allow many-to-many relationships, we add articleTags collection with two string attributes: articleId and tagId. With those two, we can define tags and assign them to articles.
Now that our database scheme is set up let’s talk permissions.
We know the server will generate articles, so we only need to give read permission to any. categories, tags, and articleTags will all be generated by the server too, so read permission to any is also enough. Finally, profiles collection must be readable by any, while users can create. We also need to enable document security, so we can later give edit permission to the user himself.
With all of that configured, we enter appwrite folder and run appwrite init collection. That stores all of our configuration into appwrite.json so we can later set up a new project if we ever need it.
🔐 Let Me In!
Although TechScrunch visitors can use the website anonymously, we will need an authorization feature to allow them to set up profiles and submit their news.
We added a few methods to our AppwriteService.ts to let visitors register, log in, log out, and reset their passwords. Additionally, we enabled GitHub OAuth provider to allow frictionless login for all developers using our website.
export const AppwriteService = {
    register: async (name: string, email: string, password: string) => {
        return await account.create(ID.unique(), email, password, name);
    },
    login: async (email: string, password: string) => {
        return await account.createEmailSession(email, password);
    },
    logout: async () => {
        return await account.deleteSession('current');
    },
    getAccount: async () => {
        try {
            return await account.get();
        } catch (err) {
            return null;
        }
    },
    resetPassword: async (email: string) => {
    const url = `${window.location.origin}/auth/password-reset`;
        return await account.createRecovery(email, url);
    },
    resetPasswordFinish: async (
        userId: string,
        secret: string,
        password: string,
        passwordAgain: string
    ) => {
        return await account.updateRecovery(userId, secret, password, passwordAgain);
    },
    oauthLogin: () => {
        account.createOAuth2Session(
            'github',
            `${window.location.origin}/`,
            `${window.location.origin}/auth/login`
        );
    }
}
We defined a few routes and designed them based on TechCrunch. With this in place, visitors could now log into their accounts, but there were no profiles so far.
To introduce a feature of public profiles, we added an automatic onboarding step during which the application creates a profile document and stores its ID in user preferences, so we can access it later when generating an article.
Profile was generated pretty empty, as we only had the user’s name that he provided during installation. That led us to add an account settings page where user can change their password and update their profile. Once again, we added methods for that into our AppwriteService.ts:
export const AppwriteService = {
    createProfile: async () => {
        const user = await AppwriteService.getAccount();
        return await databases.createDocument<Author>('default', 'authors', ID.unique(), {
            name: user?.name ?? 'Anonymous'
        });
    },
    updateProfile: async (profileId: string, changes: Partial<Author>) => {
        return await databases.updateDocument<Author>('default', 'authors', profileId, changes);
    },
    updatePrefs: async (prefs: any) => {
        return await account.updatePrefs(prefs);
    },
    getProfile: async (profileId: string) => {
        try {
            return await databases.getDocument<Author>('default', 'authors', profileId);
        } catch (err) {
            console.log(err);
            return null;
        }
    }
}
Only one piece needs to be added to our profiles feature, which is a profile picture. Let’s take a look at how we implemented it.
📸 Let Me Take A Selfie
Before adding file upload to our app, we must create a bucket profilePictures in our Appwrite Storage. This will serve as a “folder” for all the profile pictures. We can also configure it only to allow image file types, as well as configure maximum file size and more. While in Appwrite Storage, let’s create bucket thumbnails where we will store news images later. After doing those changes, let’s remember to run appwrite init storage to save our configuration into our project locally.
Now we added a hidden input with the file type above the profile picture in account settings. When clicked, the browser will show a modal and let you pick an image. Once a visitor selects an image they would like to use as a profile picture, we upload the file to Appwrite Storage and save the user ID on the profile by updating imageId attribute. Once we have the image on the profile document, instead of showing a placeholder avatar, we use Appwrite Storage API to render the image in desired resolutions. We added all of this logic into AppwriteService.ts:
export const AppwriteService = {
    uploadProfilePicture: async (file: any) => {
        return await storage.createFile('profilePictures', ID.unique(), file);
    },
    getProfilePicture: (fileId: string, width?: number, height?: number) => {
        return storage
            .getFilePreview(
                'profilePictures',
                fileId,
                width ? width : 500,
                height,
                undefined,
                undefined,
                undefined,
                undefined,
                undefined,
                undefined,
                undefined,
                undefined,
                'webp'
            )
            .toString();
    }
}
🤖 Let’s talk AI
Thanks to Appwrite Functions, we can implement our most exciting feature – an AI-powered article generator. We generate the function simply by running appwrite init function. Our function will accept a payload with title and categoryId, in which the generated news article should be stored.
Next, the function will talk to Chat GPT and ask it to Generate article for category X about Y. Make it funny and use real names. Make it at least 500 words long. In last paragraph, mention it's 1st april fool. This prompt gave us the best results so far.
Next, we ask Chat GPT for tags for this article. We can ask it to Generate 3 tech single word news related tags based on title X. Separate them by comma and make words spearated by dash. Again, this prompt showed the most useful answers, making them easy to parse.
Finally, to generate the thumbnail, we start by asking Chat GPT to Choose one word that will make a good article cover image from title X, and has good chances to find a free stock image. We take the output word and try to search Pixabay for a result. If we can’t find any, we use DALL-E to generate the image for this word.
With all the data generated, we create a new document for our article in Appwrite Database and upload a thumbnail image to Appwrite Storage. If you are interested, you can see the source code of this function on GitHub.
Once the function is finished, we deploy it with appwrite deploy functions and set permissions to users so that any user can generate it. Based on response times from Chat GPT, we also decided to increase the timeout to 3 minutes.
To allow execution the function from our web app, we add a new method to our AppwriteService.ts:
export const AppwriteService = {
    generateArticle: async (title: string, category: string) => {
        const res = await functions.createExecution(
            'generateArticle',
            JSON.stringify({ title, categoryId: category })
        );

        if (res.status === 'failed') {
            throw new Error('Internal Error. Try again later.');
        }
        if (res.response) {
            const json = JSON.parse(res.response);
            if (json.success === false) {
                throw new Error(json.msg);
            }
        }

        return res;
    }
}
🏁 Final Perk Ups
It would be really long and boring article if we showed all the code we wrote. You can see the full source code in our GitHub repository, but now, let’s go over some interesting challenges we faced during testing.
The marketing team reported the first problem they noticed: URLs are pretty long, and that might have downsides, mainly on Twitter. We decided to get a domain tsrn.ch, and for each article, generate a shortId that is base-62 encoded timestamp of creating date. That lets us create short URLs such as https://tsrn.ch/tA595pO.
Next, we noticed that sharing articles on social media didn’t have a cool preview, so we had to add multiple SEO tags to dynamic article pages. This was a challenge since it required server-side rendering, but thanks to Svelte Kit, the solution was simple.
Some of our “rookie” mistakes included the modal missing proper z-index, OG tags showing the wrong URL value, and image quality being too low for PC resolution. This goes to show no one is perfect, but with enough iterations, everything can get there 😅
We also noticed some small bugs and responsivity issues once users started generating articles, which could have been more exciting but were not.
🔗 Learn More
Now you know how we build TechScrunch 🎉 It was an amazing project to show you how Appwrite can help you build your next app and what backend capabilities you can expect Appwrite to have ready for you. Check out more about TechScrunch:
As always, we would love to see you join our Appwrite Community and start building more amazing applications. Can’t wait to see what you build! 🤩


