What is HTML Helper?
MVC provides the HTML Helper class that offers HTML controls in the razor view. HTML helper are methods that return data in the form of string. It binds the model with the view and passes a value from model properties to view and vice versa while submitting the form. There is no server-side control for this, so we have to use the HTML helper class.
RadioButton Helper
What is a RadioButton?
RadioButton is normally connected with the same group name. Users can select only one radio button at a time in the same group. We cannot select multiple radio buttons in the same group.
In MVC there are two ways to create RadioButton using HTML Helper
- RadioButtonFor
- RadioButton
RadioButtonFor
HTML.RadioButtonFor is strongly-typed control that is restricted to model property. we need to add a model name on top of the view. Strongly-typed checks for all the errors in code at the compile-time and saves our application not getting errors at run time.
Syntax
@Html.RadioButtonFor()
Example
 @Html.RadioButtonFor(m => m.Gender,"Male")
 @Html.RadioButtonFor(m => m.Gender,"Female")
RadioButton
HTML.RadioButton is loosely-typed control that is not restricted to a model property. The HTML.RadioButton is not attached with any model you must pass a string with the same name as the model property to avoid the error at runtime.
Syntax
@Html.RadioButton()
Example
 Male: @Html.RadioButton("Gender","Male")
 Female: @Html.RadioButton("Gender","Female")
We have to create a project for demonstrating of RadioButton.
Now we need to create a form model. Here I am creating a servey class for a model.
Right-click on the Models folder and add a class for a model.
ServeyFrom.cs
namespace Dynamicappendpartial.Models
{
public class SurveyForm
 {
public int id {
get;
set;
 }
[Display(Name = "Name")]
public string U_Name {
get;
set;
}
public string Gender {
get;
 set;
}
[Display(Name = "ContactNo")]
public long Contact_no {
get;
set;
}
}
}
Right-click on the controller folder and add the controller for the model class we have created and add the following code inside the controller.
Read More: How To Upload And Return Files In Asp.net Mvc?
SurveyFormsController
using System;
using System.Collections.Generic;
using System.Data;
using Dynamicappendpartial.Models;

namespace Dynamicappendpartial.Controllers
{
public class SurveyFormsController: Controller
{
private PartialDbContext db = new PartialDbContext();
public ActionResult Create()
{
return View();
}
[HttpPost]
[ValidateAntiForgeryToken]
public ActionResult Create([Bind(Include = "id,U_Name,Gender,Contact_no")] SurveyForm surveyForm)
{
if (ModelState.IsValid)
{
db.SurveyForms.Add(surveyForm);
 db.SaveChanges();
return RedirectToAction("Index");
}
return View(surveyForm);
}
}
}
Right-click on the method name and add the view to create the method. After adding view run the application.
In our Form, we require a radio button for gender instead of a text box. we need to modify the view code and add the radio button for Gender.
Create.cshtml
@model Dynamicappendpartial.Models.survey form

@using (Html.BeginForm())
{
@Html.AntiForgeryToken()SurveyForm
@Html.ValidationSummary(true, "", new { @class = "text-danger" })@Html.LabelFor(model => model.U_Name, htmlAttributes: new { @class = "control-label col-md-2" })@Html.EditorFor(model => model.U_Name, new { htmlAttributes = new { @class = "form-control" } }) @Html.ValidationMessageFor(model => model.U_Name, "", new { @class = "text-danger" })
@Html.LabelFor(model => model.Gender, htmlAttributes: new { @class = "control-label col-md-2" })@Html.RadioButtonFor(model => model.Gender, "Male") Male @Html.RadioButtonFor(model => model.Gender, "Female") Female @Html.ValidationMessageFor(model => model.Gender, "", new { @class = "text-danger" })
@Html.LabelFor(model => model.Contact_no, htmlAttributes: new { @class = "control-label col-md-2" })@Html.EditorFor(model => model.Contact_no, new { htmlAttributes = new { @class = "form-control" } }) @Html.ValidationMessageFor(model => model.Contact_no, "", new { @class = "text-danger" })

}
@Html.ActionLink("Back to List", "Index")
Now run the application and see the view is working as we excepted.
CheckBox Helper
What is a CheckBox?
A checkBox is normally used to select multiple values. A checkbox is similar to a radio button but in a checkbox, we can select multiple values, and is shown as a square box.
In MVC, there are two ways to create CheckBox using HTML Helper
CheckBoxFor
HTML.CheckBoxFor is strongly-typed control that is restricted to model property. we need to add a model name on top of the view. Strongly-typed checks for all the errors in code at the compile-time and saves our application not getting errors at run time.
Syntax
@Html.CheckBoxFor()
Example
@Html.CheckBoxFor(m => m.ASP.NET MVC)
@Html.CheckBoxFor(m => m.NET Core)
@Html.CheckBoxFor(m => m.JAVA)
@Html.CheckBoxFor(m => m.Angular)
CheckBox
HTML.CheckBox is loosely-typed control that is not restricted to a model property. The HTML.CheckBox is not attached with any model you must pass a string with the same name as the model property to avoid the error at runtime. It doesn’t check errors at run time.
Syntax
@Html.CheckBox()
Example
@Html.CheckBox("ASP.NET MVC", true)
@Html.CheckBox("NET Core", false)

@Html.CheckBox("JAVA", false)
@Html.CheckBox("Angular", false)
We have to create a project for demonstrating CheckBox.
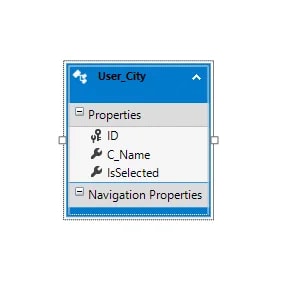
To Understand checkbox helper, we are using the following table
Searching for Reliable ASP.Net Development Company?
Our requirement is when we select the checkbox and click on submit button then we get all the checkbox values to append with some string. Show in the below image.
And if we do not select any city and click on submit button we get the following screen.
Use the following SQL script to create table User_City and insert data in the table.
CREATE TABLE User_City
(
  ID INT IDENTITY PRIMARY KEY,
  C_Name NVARCHAR(100) NOT NULL,
  IsSelected BIT NOT NULL
)
Insert into User_City values ('Pune', 0)
Insert into User_City values ('Ahmedabad', 0)
Insert into User_City values ('Cuttack', 1)
Insert into User_City values ('Mumbai', 0)
Insert into User_City values ('Bangalore', 0)
Insert into User_City values ('Delhi', 0)
Insert into User_City values ('Hyderabad', 1)
Add the ADO.NET data model to retrieve data from the database in our application.
Create Controller
Right-click on the controller folder and add the controller for the model class we have created and add the following code inside the controller.
using System.Collections.Generic;
using System.Linq;
using System.Text;
using System.Web.Mvc;
using Dynamicappendpartial.Models;

namespace Dynamicappendpartial.Controllers
{
public class User_CityController : Controller
{
private Entities db = new Entities();

[HttpGet]
public ActionResult Index()
{
return View(db.User_City.ToList());
}
[HttpPost]
public string Index(IEnumerable user_Cities)
{
if(user_Cities.Count(x => x.IsSelected) == 0)
{
 return "You have not select any city";
}
else
{
StringBuilder sb = new StringBuilder();
sb.Append("Your selected city is -");
foreach(User_City user_City in user_Cities)
{
if(user_City.IsSelected)
{
sb.Append(user_City.C_Name + " , ");
}
}
sb.Remove(sb.ToString().LastIndexOf(" , "), 1);
return sb.ToString();
}
}
}
}
Right-click on the index method and add the index view. Add the following code inside the index view
@model List
@{
ViewBag.Title = "Index";
}
@using (Html.BeginForm())
{


for (var i = 0; i < Model.Count(); i++)
{
@Html.HiddenFor(it => it[i].ID)
@Html.HiddenFor(it => it[i].C_Name)
@Html.DisplayFor(it => it[i].C_Name)
@Html.CheckBoxFor(it => it[i].IsSelected, new { Style = "vertical-align:3px ; margin-left:2px;}" })
}

}
Now run the application and test our requirement it will be working as we excepted.
Conclusion
Here in this blog, we learned the usage of RadioButton and CheckBox using HTML Helper in MVC application. We have also gone through various types with real-time example.


