With various access control models and implementation methods available, constructing an authorization system for backend service APIs can still be challenging. However, the ultimate goal is to ensure that the correct individual has appropriate access to the relevant resource. In this article, we will discuss how to enable the Role-based access control(RBAC) authorization model for your API with open-source API Gateway Apache APISIX and Open Policy Agent (OPA).
Learning objectives
You will learn the following throughout the article:
- What is RBAC and how it works?
- What is OPA and how it works?
- How to implement RBAC with OPA and Apache APISIX?
- How to define and register the policy in OPA.
- How to create an upstream, route, and enable OPA plugin.
- How the user’s role and permission is parsed from JWT token payload or consumer data.
What is RBAC?
Role-Based Access Control (RBAC)and Attribute-Based Access Control (ABAC) are two commonly used access control models used to manage permissions and control access to resources in computer systems. RBAC assigns permissions to users based on their role within an organization. In RBAC, roles are defined based on the functions or responsibilities of users, and permissions are assigned to those roles. Users are then assigned to one or more roles, and they inherit the permissions associated with those roles. In the API context, for example, a developer role might have permission to create and update API resources, while an end-user role might only have permission to read or execute API resources.
Basically, RBAC assigns permissions based on user roles, while ABAC assigns permissions based on attributes associated with users and resources.
In RBAC, a policy is defined by the combination of a user’s assigned role, the actions they are authorized to perform, and the resources on which they can perform those actions.
What is OPA?
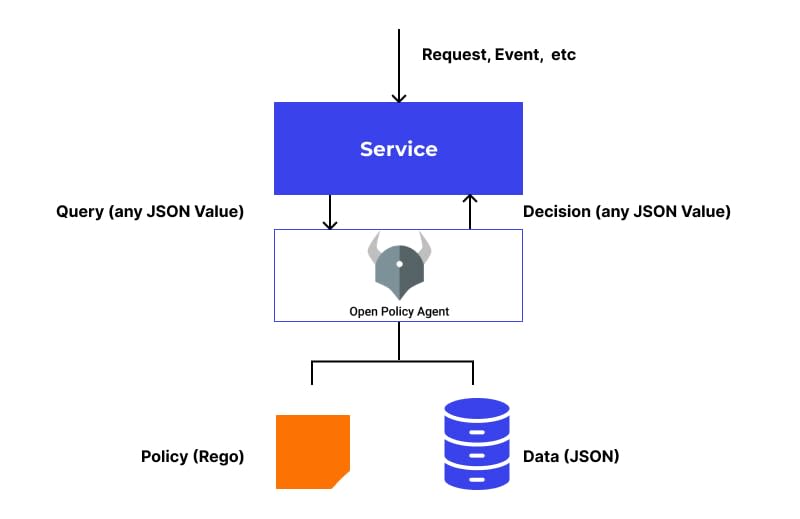
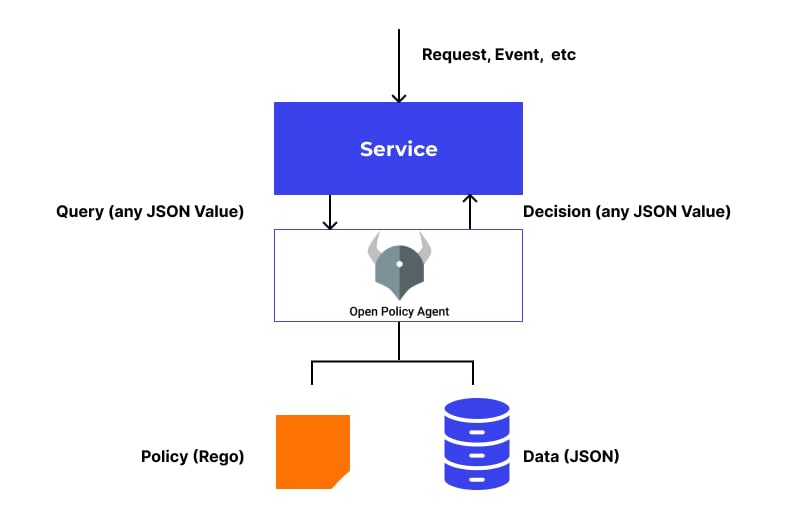
OPA (Open Policy Agent) is a policy engine and a set of tools that provide a unified approach to policy enforcement across an entire distributed system. It allows you to define, manage, and enforce policies centrally from a single point. By defining policies as code, OPA enables easy review, editing, and roll-back of policies, facilitating efficient policy management.
OPA provides a declarative language called Rego, which allows you to create and enforce policies throughout your stack. When you request a policy decision from OPA, it uses the rules and data that you have provided in a .rego file to evaluate the query and produce a response. The query result is then sent back to you as the policy decision. OPA stores all the policies and the data it needs in its in-memory cache. As a result, OPA returns results quickly. Here is an example of a simple OPA Rego file:
package example

default allow = false

allow {
    input.method == "GET"
    input.path =="/api/resource"
    input.user.role == "admin"
}
In this example, we have a package called “example” that defines a rule called “allow”. The “allow” rule specifies that the request is allowed if the input method is “GET”, the requested path is /api/resource, and the user’s role is “admin”. If these conditions are met, then the “allow” rule will evaluate as “true”, allowing the request to proceed.
Why use OPA and API Gateway for RBAC?
API Gateway provides a centralized location to configure and manage API, and API consumers. It can be used as a centralized authentication gateway by avoiding having each individual service implement authentication logic inside the service itself. On the other hand, OPA adds an authorization layer and decouples the policy from the code by creating a distinct benefit for authorization. With this combination, you can add permissions for an API resource to a role. Users might be associated with one or more user roles. Each user role defines a set of permissions (GET, PUT, DELETE) on RBAC resources (defined by URI paths). In the next section, let’s learn how to achieve RBAC using these two.
How to implement RBAC with OPA and Apache APISIX
In Apache APISIX, you can configure routes and plugins to define the behavior of your API. You can use the APISIX opa plugin to enforce RBAC policies by forwarding requests to OPA for decision-making. Then OPA makes an authorization decision based on users’ roles and permissions in real-time.
Assume that we have Conference API where you can retrieve/edit event sessions, topics, and speaker information. A speaker can only read their own sessions and topics while the admin can add/edit more sessions and topics. Or attendees can leave their feedback about the speaker’s session via a POST request to /speaker/speakerId/session/feedback and the speaker can only see by requesting the GET method of the same URI. The below diagram illustrates the whole scenario:
- API consumer requests a route on the API Gateway with its credential such as a JWT token in the authorization header.
- API Gateway sends consumer data with a JWT header to the OPA engine.
- OPA evaluates if the consumer has a right to access the resource by using policies (roles and permissions) we specify in the .rego file.
- If the OPA decision is allowed, then the request will be forwarded to the upstream Conference service.
Next, we install, configure APISIX, and define policies in OPA.
Prerequisites
- Docker is used to installing the containerized etcd and APISIX.
- curl is used to send requests to APISIX Admin API. You can also use tools such as Postman to interact with the API.
Step 1: Install Apache APISIX
APISIX can be easily installed and started with the following quickstart script:
curl -sL https://run.api7.ai/apisix/quickstart | sh
Step 2: Configure the backend service (upstream)
To route requests to the backend service for the Conference API, you’ll need to configure it by adding an upstream server in Apache APISIX via the Admin API.
curl http://127.0.0.1:9180/apisix/admin/upstreams/1 -X PUT -d '
{
   "name":"Conferences API upstream",
   "desc":"Register Conferences API as the upstream",
   "type":"roundrobin",
   "scheme":"https",
   "nodes":{
      "conferenceapi.azurewebsites.net:443":1
   }
}'
Step 3: Create an API consumer
Next, we create a consumer (a new speaker) with the username jack in Apache APISIX. It sets up the jwt-auth plugin for the consumer with the specified key and secret. This will allow the consumer to authenticate using a JSON Web Token (JWT).
curl http://127.0.0.1:9180/apisix/admin/consumers -X PUT -d '
{
    "username": "jack",
    "plugins": {
        "jwt-auth": {
            "key": "user-key",
            "secret": "my-secret-key"
        }
    }
}'
Step 4: Create a public endpoint to generate a JWT token
You also need to set up a new Route that generates and signs the token using the public-api plugin. In this scenario, API Gateway acts as an identity provider server to create and verify the token with our consumer jack’s key. The identity provider can be also any other 3rd party services such as Google, Okta, Keycloak, and Ory Hydra.
curl http://127.0.0.1:9180/apisix/admin/routes/jas -X PUT -d '
{
    "uri": "/apisix/plugin/jwt/sign",
    "plugins": {
        "public-api": {}
    }
}'
Step 5: Claim a new JWT token for the API consumer
Now we can get a new token for our speaker Jack from the API Gateway using the public endpoint we created. The following curl command generates a new token with Jack’s credentials and assigns role, and permission in the payload.
curl -G --data-urlencode 'payload={"role":"speaker","permission":"read"}' http://127.0.0.1:9080/apisix/plugin/jwt/sign?key=user-key -i
After you run the above command, you will receive a token as a response. Save this token somewhere, later we are going to use this token to access our new API Gateway endpoint.
Step 6: Create a new plugin config
This step involves configuring APISIX’s 3 plugins, proxy-rewrite, jwt-auth and opa plugins.
curl "http://127.0.0.1:9180/apisix/admin/plugin_configs/1" -X PUT -d '
{
   "plugins":{
      "jwt-auth":{
      },
      "proxy-rewrite":{
         "host":"conferenceapi.azurewebsites.net"
      }
   }
}'
- The
proxy-rewriteplugin is configured to proxy requests to theconferenceapi.azurewebsites.nethost. - OPA authentication plugin is configured to use the OPA policy engine running at http://localhost:8181/v1/data/rbacExample. Also, APISIX sends all consumer-related information to OPA. We will add this policy .
regofile in the Opa configuration section.
Step 7: Create a Route for Conference sessions
The final step is to create a new route for Conferences API speaker sessions:
curl "http://127.0.0.1:9180/apisix/admin/routes/1" -X PUT -d '
{
    "name":"Conferences API speaker sessions route",
    "desc":"Create a new route in APISIX for the Conferences API speaker sessions",
    "methods": ["GET", "POST"],
    "uris": ["/speaker/*/topics","/speaker/*/sessions"],
    "upstream_id":"1",
    "plugin_config_id":1
}'
The payload contains information about the route, such as its name, description, methods, URIs, upstream ID, and plugin configuration ID. In this case, the route is configured to handle GET and POST requests for two different URIs, /speaker/topics and /speaker/sessions. The “upstream_id” field specifies the ID of the upstream service that will handle incoming requests for this route, while the “plugin_config_id” field specifies the ID of the plugin configuration to be used for this route.
Step 8: Test the setup without OPA
So far, we have set up all the necessary configurations for APISIX to direct incoming requests to Conference API endpoints, only allowing authorized API consumers. Now, each time an API consumer wants to access an endpoint, they must provide a JWT token to retrieve data from the Conference backend service. You can verify this by hitting the endpoint and the domain address we are requesting now is our custom API Gateway but not an actual Conference service:
curl -i http://127.0.0.1:9080/speaker/1/topics -H 'Authorization: {API_CONSUMER_TOKEN}'
Step 9: Run OPA service
The other two steps are we run the OPA service using Docker and upload our policy definition using its API which can be used to evaluate authorization policies for incoming requests.
docker run -d --network=apisix-quickstart-net --name opa -p 8181:8181 openpolicyagent/opa:latest run -s
This Docker command runs a container of the OPA image with the latest version. It creates a new container on the existing APISIX network apisix-quickstart-netwith the name opaand exposes port 8181. So, APISIX can send policy check requests to OPA directly using the address [http://opa:8181](http://opa:8181) Note that OPA and APISIX should run in the same docker network.
Step 10: Define and register the policy
The second step on the OPA side is you need to define the policies that will be used to control access to API resources. These policies should define the attributes required for access (Which users have which roles) and the permission (Which roles have which permissions) that are allowed or denied based on those attributes. For example, in the below configuration, we are saying to OPA check the user_roles table what is the role for jack. This information is sent by APISIX inside input.consumer.username. Also, we are verifying the consumer’s permission by reading the JWT payload and extracting token.payload.permission from there. The comments describe the steps clearly.
curl -X PUT '127.0.0.1:8181/v1/policies/rbacExample'
    -H 'Content-Type: text/plain'
    -d 'package rbacExample

# Assigning user roles

user_roles := {
    "jack": ["speaker"],
    "bobur":["admin"]
}

# Role permission assignments
role_permissions := {
    "speaker": [{"permission": "read"}],
    "admin":   [{"permission": "read"}, {"permission": "write"}]
}

# Helper JWT Functions
bearer_token := t {
 t := input.request.headers.authorization
}

# Decode the authorization token to get a role and permission
token = {"payload": payload} {
 [_, payload, _] := io.jwt.decode(bearer_token)
}

# Logic that implements RBAC
default allow = false

allow {
    # Lookup the list of roles for the user
    roles := user_roles[input.consumer.username]

    # For each role in that list
    r := roles[_]

    # Lookup the permissions list for role r
    permissions := role_permissions[r]

    # For each permission
    p := permissions[_]

    # Check if the permission granted to r matches the users request
    p == {"permission": token.payload.permission}
}'
Step 11: Update the existing plugin config with the OPA plugin
Once we defined policies on the OPA service, we need to update the existing plugin config for the route to use the OPA plugin. We specify in the policy attribute of the OPA plugin.
curl "http://127.0.0.1:9180/apisix/admin/plugin_configs/1" -X PATCH -d '
{
   "plugins":{
      "opa":{
         "host":"http://opa:8181",
         "policy":"rbacExample",
         "with_consumer":true
      }
   }
}'
Step 12: Test the setup with OPA
Now we can test all setups we did with OPA policies. If you try to run the same curl command to access the API Gateway endpoint, it first checks the JWT token as the authentication process and sends consumer and JWT token data to OPA to verify the role and permission as the authorization process. Any request without a JWT token in place or allowed roles will be denied.
curl -i http://127.0.0.1:9080/speaker/1/topics -H 'Authorization: {API_CONSUMER_TOKEN}'
Conclusion
In this article, we learned how to implement RBAC with OPA and Apache APISIX. We defined a simple custom policy logic to allow/disallow API resource access based on our API consumer’s role and permissions. Also, this tutorial demonstrated how we can extract API consumer-related information in the policy file from the JWT token payload or consumer object sent by APISIX.
Related resources
Recommended content
Community
🙋 Join the Apache APISIX Community
🐦 Follow us on Twitter
📝 Find us on Slack
💁 How to contribute page
About the author
Visit my blog: www.iambobur.com


