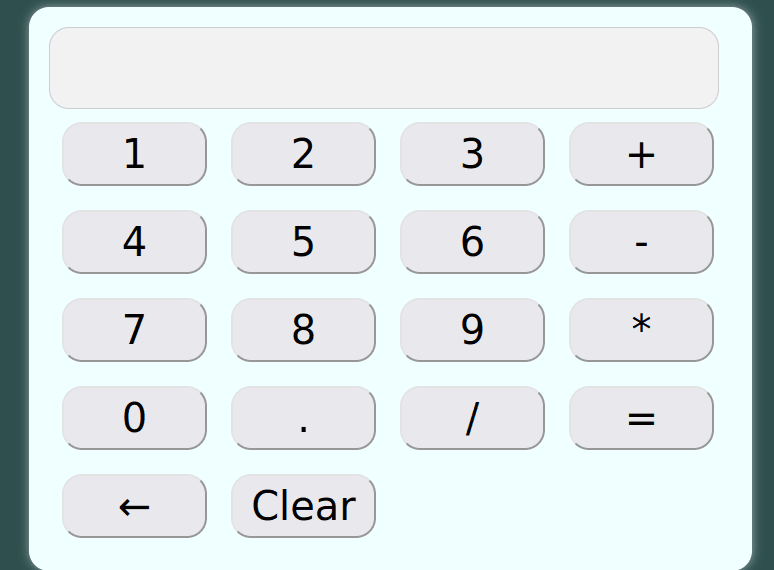
As a beginner in JavaScript, am sure you have come across the concept of building projects for your portfolio, for the sake of enhancing your knowledge in the language. Well, I will be guiding you today on how to build a simple JavaScript calculator with only 10 lines of code to add to your portfolio, sounds cool, right? Let’s go!
For this tutorial, you will need a basic understanding of:
- The use of
and
tag in HTML.- How to assign id to elements and reference them in CSS and
JavaScript.- How to reference your style sheet and JavaScript code
- How JavaScript functions work.
- The use of eval() and slice() methods.
NOTE!!! For real life applications it is advisable to avoid the eval() method. The reason being it takes a string and executes it as a JavaScript expression, so attackers can use it as a vulnerability in your application.
- How to reference variables inside the JavaScript code.
That’s it, it is all you need to know! So let’s dive right in.
HTML
Here is the HTML structure:
Web Calculator In the code above, we have added a
with the id “div” which holds the contents of our calculator. It’s first element is another div, that holds an tag which will be referenced by our JavaScript code to enable easy input of numbers and operators in our calculator, via the buttons or our PC’s keyboard.We have a table element that has 5 table rows (
) elements. Rows 1-4 have 3 table data ( ) elements each, which contain buttons. This buttons hold an onclick()method, which passes the functionaddToDisplay(how these functions work is explained better in the JavaScript section). This excludes the=button which has a differentonclick()functioncalculate().On row 5, there are 2 table data elements,
clearand←(backspace), which also have different functionsclearInput()andbackspacerespectively.The buttons are also assigned values and symbols, which shows what actions they perform on the display.
CSS
Let’s checkout our styling:
/*style out the div element,mainly to center it to the parent container and also produce a beautiful shadow effect*/ #div{ margin: 0 auto; width:50%; position: absolute; top: 50%; left: 50%; transform: translate(-50%, -50%); color: azure; border-radius: 20px; box-shadow: 0 0 10px rgba(250, 253, 255, 0.5); background-color: azure; padding: 20px; } /*style the input section, which is a div within the main div, to ensure that the output i.e the numbers and the result are as similar as possible with of a calculator*/ #displayPanel{ background-color: #f2f2f2; border: 1px solid #ccc; color: black; border-radius: 20px; font-size: 40px; height: 60px; line-height: 60px; padding: 10px; text-align: right; font-family: 'Digital-7';/*this is the font family that produces the calculator-like numbers*/ width: 95%; } body{ background-color: darkslategray; } /*style for all the button elements*/ button{ width: 145px; height: 50px; font-size: 40px; padding: 30px; margin: 10px; font-family: sans-serif; display: flex; align-items: center; justify-content: center; border-radius: 20px; background-color: 0 0 10px rgba(0, 0, 0, 0.5); } /*the hover effect*/ button:hover{ transform: translateY(-5px); transform: translateX(-5px); font-size: 30px; width: 130px; height: 30px; font-family: 'Digital-7'; } /*this is a downloaded font known as digital-7 downloaded from https://www.dafont.com*/ @font-face { font-family: 'Digital-7'; src: url('../JSCalculator/digital-7.ttf'); }In this CSS, am sure you are familiar with 90% of the elements and how they work, however, 2 cases might stand out;
@font-faceandtransform:elements.
@font-face
The
@font-facerule in CSS allows you to define custom fonts to be used on your web page, instead of relying solely on the limited number of fonts installed on the user’s device. The@font-facerule is typically used to load web fonts from external sources, such as Google Fonts or Typekit, but you can also use it to load custom fonts from your own server.To use
@font-face, you need to define the font family name, the URL of the font file, and any additional font properties such as font weight, style, and format. In our case we have used theDigital-7font located inJSCalculator/digital-7.ttfof my root storage. That being done, you can use it anywhere in the CSS.I choose this font to imitate a real life calculator’s display as well as I can. Hope you will like it. If you want it, you can get it in Dafont
JAVASCRIPT
You can go ahead and count, there are only 10 lines of executable code in:
// Get the HTML input box element by its ID and store it in a variable let display = document.getElementById('displayPanel'); // Function to add a value to the end of the input box's text and then append the value to the current value function addToDisplay(value) { display.value += value; }; // Function to clear the input box's text by setting the input box's value to an empty string function clearInput() { display.value = ''; }; // Function to remove the last character from the input box's text by using the slice() method function backspace() { display.value = display.value.slice(0, -1); }; /* Function to evaluate the input box's text as a mathematical expression and display the result by using the eval method and setting the input box value to that result*/ function calculate() { let result = eval(display.value); display.value = result; }; //IT IS NEVER ADVISABLE TO USE THE eval() IN REAL LIFE APPLICATIONS TO AVOID VULNERABILITIES TO YOUR APPLICATION!!!!!For better visual clarity, I have explained each function immediately above it’s definition.
and remember BE CAREFUL WHEN USING eval()In the end your calculator should look something like this:
Read NextHow to Use VSCode with Raspberry Pi Pico W and MicroPython
Youtube Video This tutorial demonstrates how to start coding on the Raspberry Pi Pico or Pico W using… - How to assign id to elements and reference them in CSS and


