🚀 We did explore the Micro-services Architecture and also seen the Implementation using NodeJS. But did you think what will happen if any underlying micro-service failed and our service depends on that. It means our service will fails too right?
💎 So, That is where fault tolerance comes into play and we can make our system fault using Circuit breakers.
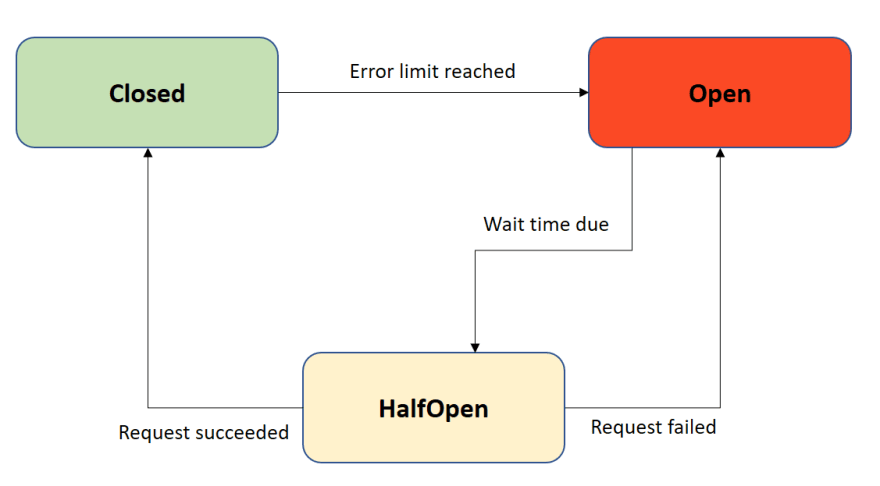
📍 It has three states, just like the electric circuit:-
🚀 Closed State
Closed state means requests can go through and the error rate is either zero or under a certain limit.
🚀 Open State
Open State means it has surpass the error rate and now no requests can go further.
🚀 Half-Open State
This state means Error limit has been reached and circuit will be open for small duration to check if it has been healed or not. If it is healed then it will go to the closed state again.
🔥 Implementing Circuit Breaker Design in NodeJS
Our design of circuit breaker will contain a class having methods as follows:-
😎 Fire will be triggered while making requests, Success will be triggered on success, and Fail will be triggered on failure
const axios = require('axios');
const CircuitBreakerStates = {
  OPENED: "OPENED",
  CLOSED: "CLOSED",
  HALF: "HALF"
}

class CircuitBreaker {
  request = null;
  state = CircuitBreakerStates.CLOSED;
  failureCount = 0;
  failureThreshold = 5; // number of failures to determine when to open the circuit
  resetAfter = 50000;
  timeout = 5000; // declare request failure if the function takes more than 5 seconds

  constructor(request, options) {
    this.request = request;
    this.state = CircuitBreakerStates.CLOSED; // allowing requests to go through by default
    this.failureCount = 0;
    // allow request to go through after the circuit has been opened for resetAfter seconds
    // open the circuit again if failure is observed, close the circuit otherwise
    this.resetAfter = Date.now();
    if (options) {
      this.failureThreshold = options.failureThreshold;
      this.timeout = options.timeout;
    }
    else {
      this.failureThreshold = 5; // in ms
      this.timeout = 5000; // in ms
   }
  }

  async fire() {
    if (this.state === CircuitBreakerStates.OPENED) {
      if (this.resetAfter <= Date.now()) {
        this.state = CircuitBreakerStates.HALF;
      } else {
        throw new Error('Circuit is in open state right now. Please try again later.');
      }
    }
    try {
      const response = await axios(this.request);
      if (response.status === 200) return this.success(response.data);
      return this.failure(response.data);
    }
    catch(err) {
      return this.failure(err.message);
    }
  }

  success(data) {
    this.failureCount = 0
    if (this.state === CircuitBreakerStates.HALF) {
      this.state = CircuitBreakerStates.CLOSED;
    }
    return data;
  }


  failure(data) {
    this.failureCount += 1;
    if (
      this.state === CircuitBreakerStates.HALF ||
      this.failureCount >= this.failureThreshold
    ) {
      this.state = CircuitBreakerStates.OPENED;
      this.resetAfter = Date.now() + this.timeout;
    }
    return data;
  }
}
📍 Making Requests
Now, while making any request we’ll wrap our request as:-
// sample request to fetch data asynchronously
const request = axios fetchDataFromExternalVendor();
// wrap the request within a circuit breaker object
const circuitBreakerObject = new CircuitBreaker(request, { failureThreshold: 4, timeout: 4000 });
// fire the request
circuitBreakerObject.fire()
  .then((data) => console.log(data))
  .catch((err) => console.log(some error occurred = ${err.message}`);
You can use Opossum Library in NodeJS to use a predefined Circuit breaker. In JAVA, we use Hystrix from Netflix.
🚀 I hope you have really enjoyed the blog. Don’t forget to check our 🐥 Twitter #100DaysOfCode for building an end-to-end Enterprise level Product with mentorship for free (Beginner Friendly).
Reference:- LogRocket


